Take a Photo and Add a Control Point
Learn how to take a photo and add a control point to get precise location on the photo.
Take a photo and add a control point in 4 steps:
- Take a photo
- Identify a reference position
- Move to the position
- Create control point
See the video tutorial (1 min 21 s)
For precise location, add one control point per photo.
A single control point allows for 4 to 6 times more accurate positioning.
This tutorial illustrates how to add a control point using your own position (with the phone GPS) as reference, it is well suited to prepare photo directly in the field. You can also directly specify the map coordinates of a landmark. See Take a Control Point on a Map.
1. Take a photo
Choose a location with a clear view of your route and take a photo.
The ideal shooting distance ranges from 500 m to 3 km (from 1500 ft to 2 mi).
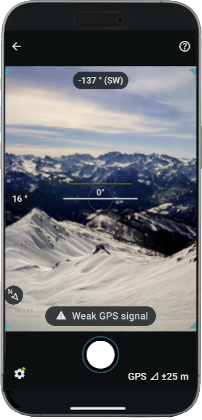
To optimize positioning accuracy:
- Hold the position of the phone when shooting.
- Check that the GPS position is accurate enough before taking the photo, wait a few seconds if necessary.
2. Identify a reference position
To plan control point creation, we recommend to spot a reference position as soon as you take the photo in Veezer.
- Choose a place where you plan to go. Your own position will be used as a reference.
- Choose a place that is easily identifiable in the photo (rock, tree, summit, pass, building, etc.).
- The position must be at least 300 m (1000 ft) from the photo to obtain good accuracy.
Example of control point:
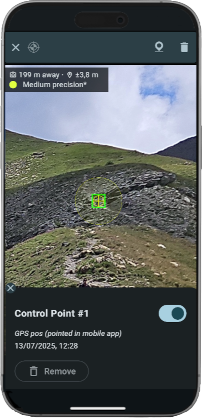
The greater the distance, the more accurate the control point will be.
3. Move to the reference position
Move to the selected reference position.
Your own position (with the phone GPS) will be used as reference, it must match the place you identified on the photo.
You can also directly specify the map coordinates of a position. See Take a Control Point on a Map.
4. Create control point
Once you have reached the selected position, zoom in on the image to locate your position then tap Create Control Point button (or long-press the photo).
- Point the position precisely on the photo.
- Check that the GPS accuracy is sufficient.
Validate to create the control point. The location on the photo is immediately updated.
A bad control point can completely distort the location on the photo.
A single control point enable precise location on the photo, suitable for GPS tracking within the photo.
Accuracy can be further improved by adding more control points.