Take a Control Point on a Map
Learn how to add control points using a known cartographic position as reference.
Take a Control Point on a Map in 3 steps:
- Identify a reference point
- Create Control Point, click Set Position
- Enter coordinates
See the video tutorial (1 min 13 s)
1. Identify a Reference Position
Use your Favorite Mapping App
Use a 3rd party app: you can use your favorite mapping app (whympr, iphigenie, wetrek, outdoor active, etc.), app from country specific map providers (Cartes IGN, IGN Geoportail) or even Google Maps, Google Earth, Apple Plan, Bing Maps. Panorama viewer app (PeakFinder, etc.) can also help.
Check out this post on Veezer Blog to view a list of relevant apps to get references.
Use a reference with a relevant precision.
You will need altitude, check that you can easily get it.
It's sometimes easier to take points on an aerial image (georeferenced).
Identify a matching point
Choose a location that is easily identifiable in the photo and on the map, more than 300 m away (1000 ft).
The greater the distance, the more accurate the control point will be.
Ensure you can get the complete coordinates on this point from the map (latitude, longitude and altitude). Don't forget you also need altitude.
2. Create Control Point, click Set Position
Create a control point, and click Set position button to enter cartographic coordinates.
Start Control Point creation
Zoom in on the image to locate the selected position then tap Create Control Point button (or long-press the photo).
Point the position precisely on the photo.
You can ignore the GPS signal, the GPS won't be used here.
Click Set position button
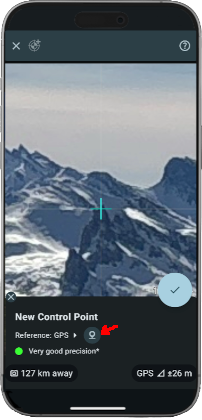
Click Set position button to define the cartographic position.
3. Enter Coordinates
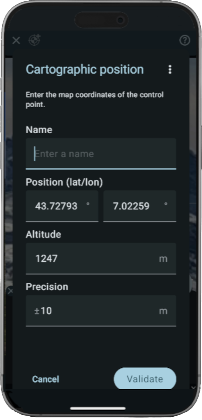
The cartographic position is obtained from the map.
Report latitude, longitude and altitude in the form.
It's often convenient to copy/paste these values from the 3rd party app, either one by one at field level, either globally from menu Paste point.
You can also import a GPX file saved from your 3rd party app.
You need 3D points: don't forget to specify the altitude for your points.
Enter the coordinates and other properties:
- Name (optional)
- Cartographic position with latitude, longitude, and altitude.
- Precision (optional): estimated reference precision. Default is 10 m (suited for 1:25000 map).
The following actions are available from menu:
- Export GPX point: export current position to a GPX file
- Copy point: copy current position to clipboard
- Import GPX point: import position from a GPX file
- Paste point: copy position from clipboard
- Current position (GPS): set position from GPS
Supported clipboard formats:
- 2 fields lat,lon:
44.699631, 7.129146,44.194434°N 7.186115°E - 3 fields lat,lon,alt:
44.699631,7.129146,157.2 - 5 fields name,lat,lon,alt,prec:
my control point,44.699631,7.129146,157.2,10
Various latitude and longitude formats are supported: decimal degrees, degrees and decimal minutes, or degrees minutes seconds (eg. 44°11'40"N 7°11'09"E).
Paste point is very versatile and and is made to quickly get coordinates from a 3rd party app. Most coordinate formats of 3rd party app are supported (Apple Plan, Google Map, Google Earth, IGN Cartes, Wetrek, Whympr, etc.).
When importing a 2D position from GPX or from clipboard, do not forget to specify the missing altitude.
Validate the control point creation.
The positioning of the photo is immediately updated.