Photo View
Display a photo, locate your position and manage the photo.
This screen is available from main screen when you click on a photo.
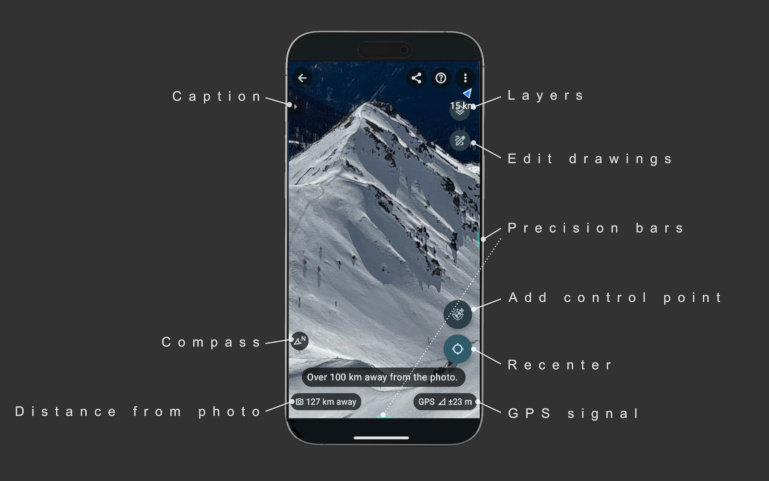
Visualize a Photo
- Zoom and pan in photo
- Visualize photo orientation
- Estimate photo positioning precision
- Display information about the photo
The following controls are proposed:
- Compass: provides the photo view orientation
- Distance from photo: the distance between your current position and the photo position
- Altitude: current altitude (MSL) given by the phone GPS.
- GPS signal: current GPS precision.
- Precision bars: to quickly estimate the positioning precision according to the zoom level.
- Caption: editable photo caption (for title, description, credits, etc).
- Layers: show or hide control points or drawings.
Use double-tap to quickly change the zoom.
You can estimate the accuracy of the photo positioning with the side precision bars (blue bars).
Use Favorite button to add the photo to your favorites in the photo gallery.
Click Share button to share the photo (see Share the Photo).
Position yourself in the photo
Your location appears as a blue dot as soon as you are in the photo frame.
- Locate yourself in the photo
- Visualize the surrounding landscape
- Estimate positioning precision
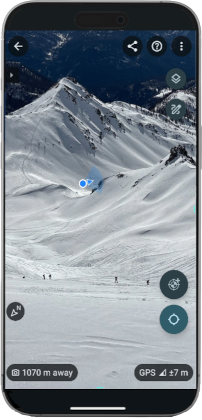
The application does not take into account occlusions. Your location appears in the photo even if you are obscured by certain details (ridge, vegetation, etc.).
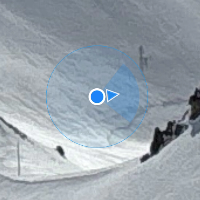
Position details:
- Current location: real time estimated position on the photo using GPS.
- Position precision (light blue circle): GPS precision on the photo.
- Phone orientation (blue arrow): phone pointing direction on the photo.
The accuracy of the positioning depends on the shot and can be improved with control points.
Recenter: use Recenter button to recenter the view on your current position (if you are in the field of view),
or click on the blue finder arrow when it's displayed.
Calibrate a Photo
For optimal accuracy, it is recommended to add one control point per photo.
A control point allows you to improve or verify the location by pointing a reference position on the photo.
A single control point allows for 4 to 6 times more accurate positioning.
Add a control point when you arrive at a location that is easily identifiable in the photo, more than 300 m away (1000 ft). You can also specify the map coordinates of a landmark.
- Add one control point per photo
- You can create several control points and manage photo referencing accurately
- Learn how to check and improve photo positioning precision
Identify a Reference Position
You can use your own position as a reference during your journey, or you can directly specify the map coordinates of a position.
Choose a place that is easily identifiable in the photo (rock, tree, summit, pass, building, etc.).
The control point must be at least 300 m (1000 ft) from the photo to obtain good accuracy. The greater the distance, the more accurate the control point will be.
Create a Control Point
Zoom in on the image to locate your position.
Tap Create Control Point button (or long-press the photo).
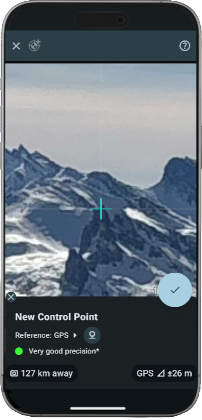
Point the position precisely on the photo.
If you're using your own position, check that the GPS accuracy is sufficient.
A bad control point can completely distort the location on the photo.
Validate to create the control point. The location on the photo is immediately updated.
Set Reference from a Map
Click Set position button to define the cartographic coordinates of a reference position.
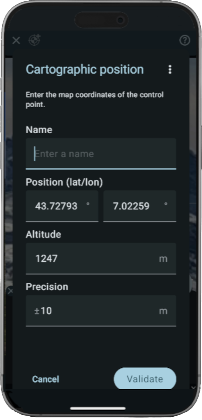
Enter the reference properties:
- Name (optional)
- Cartographic position with latitude, longitude, and altitude.
- Precision (optional): estimated reference precision. Default is 10 m (suited for 1:25000 map).
The following actions are available from menu:
- Export GPX point: export current position to a GPX file
- Copy point: copy current position to clipboard
- Import GPX point: import position from a GPX file
- Paste point: copy position from clipboard
- Current position (GPS): set position from GPS
Supported clipboard formats:
- 2 fields lat,lon:
44.699631, 7.129146,44.194434°N 7.186115°E - 3 fields lat,lon,alt:
44.699631,7.129146,157.2 - 5 fields name,lat,lon,alt,prec:
my control point,44.699631,7.129146,157.2,10
Various latitude and longitude formats are supported: decimal degrees, degrees and decimal minutes, or degrees minutes seconds (eg. 44°11'40"N 7°11'09"E).
Paste point is very versatile and and is made to quickly get coordinates from a 3rd party app. Most coordinate formats of 3rd party app are supported (Apple Plan, Google Map, Google Earth, IGN Cartes, Wetrek, Whympr, etc.).
When importing a 2D position from GPX or from clipboard, do not forget to specify the missing altitude.
Set Reference from Sun Position*
When the sun is visible in the photo, you can use it as a reference.
Select Reference Sun and point solar position.
Because of the brightness, the accuracy of the measurement of the solar position on the photo is medium.
(*) This feature is available on Android only.
Edit a Control Point
Select a control point to modify or delete it.
- Enable/disable: enabled points are used for photo positioning and checking ; disabled points are used only for checking.
- Set position: edit reference properties: name, position and precision.
- Remove: delete the control point.
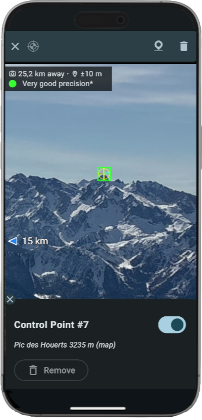
Control Point Display
Control point display allows to check photo positioning.
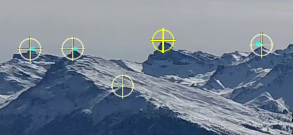
Display includes:
- Control point color: enabled (yellow) or disabled (light yellow) status.
- Thick blue segment: reprojection error on the photo.
Select a control point to get additional info:
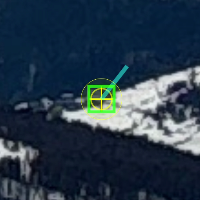
- Yellow circle (when selected): reference precision on the photo.
Check the top details to get more metrics:

- Distance from photo: the distance between the control point and the photo position.
- Reference precision: typically, the GPS precision for a point created for a GPS.
- Estimated precision: based on point distance and reference precision, the indicated precision assumes precise pointing on the photo.
About Precision
A single control point improves accuracy by a factor of 3 to 6, depending on the phone, and achieves an accuracy of approximately 0.5% across the entire photo. This precision is suitable for GPS tracking within the photo.
Accuracy can be further improved by adding more control points.
By adding more control points, you can adjust and estimate photo positioning precision very accuractely.
See also Photo Referencing.
Photo referencing
Menu | Photo referencing
Open Photo Referencing to access advanced options to improve photo positioning. This is relevant when using several control points.
Rotate
Menu | Rotate
Change photo orientation by applying a counter clockwise 90° rotation.
Viewpoint
Menu | Viewpoint
Display the point of view of the photo in 3rd party apps: PeakFinder, Relief Maps, Google Earth, OpenStreetMap.
Information about photo
Menu | Information about photo
Open Information about Photo.
Read-only
Menu | Read-only
Enable or Disable photo edition. Use this option to avoid unexpected edition on your production.
To protect your publications and limit modification and copy rights, see the sharing option Protect content
Edit Drawings
Click Edit Drawings button to open Drawing Tools.
Navigation Information
Click on distance, altitude, or GPS signal to display more information about navigation.
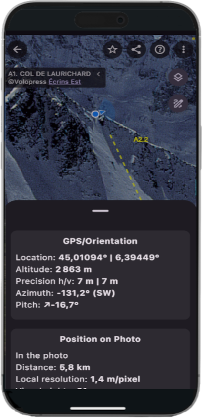
GPS/Orientation
Current location and orientation:
- Location: latitude and longitude (decimal degrees)
- Alitude: altitude (MSL)
- Precision: location and altitude precision in meters
- Azimuth: heading in degrees
- Pitch: pitch in degrees
Position on Photo
Current position on photo:
- Status
- Distance: distance from camera
- Local resolution: ground sampling distance at current location
- View height: height difference from camera